
Rhino+Gh: Grasshopper for Beginners (7)
We continue with the Grasshopper for Beginners series by explaining Rhino+Gh workflow principles. What does GH add to Rhino‘s standard drawing and modeling functions? To put the question differently, what does GH do that conventional modeling programs, such as Rhino, can’t? What is the difference and relationship between Rhino+Gh? Let’s take an example to answer these questions. Our example is about parametrically describing a surface model and deriving its alternatives. First, we will try to create a surface using only Rhino commands. Therefore, turn off GH for a short time and focus on the Rhino screen. We want to create a surface in the form of a glass or a vase. To do this, we will use the Revolve command under Rhino’s Surface menu.
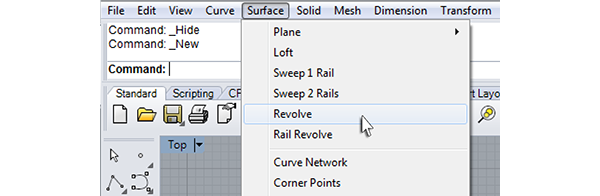
After running the command, we are expected to answer some questions in order to create the surface. As we mentioned earlier, the sequential question-and-answer method on the command line will be familiar to AutoCAD users. The requirements to perform the revolve operation are a profile curve, an axis of rotation, and an angle of rotation, respectively. This means that we must have drawn a profile curve beforehand in order to perform the operation. Let’s create this desired profile curve before exiting the Revolve command with the Esc key on the keyboard. We need to draw a profile curve in the Front View, that is, in the front view, using the Line command.
To quickly switch between different views such as top, front, and perspective on the Rhino screen, you can press F1, F2, F3, and F4 while pressing the CTRL key on the keyboard, or you can navigate through the existing images with the CTRL + Tab key.
Profile Curve
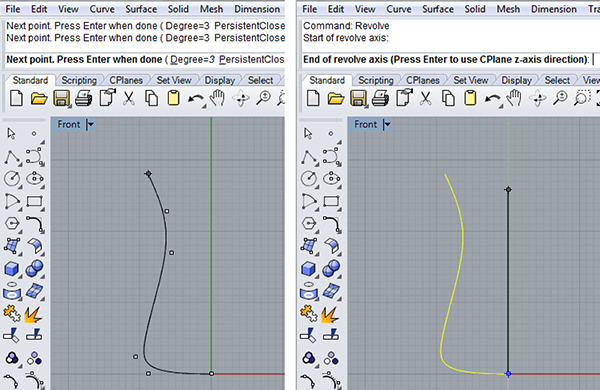
At these stages, you can try your AutoCAD knowledge, for example, Object Snap (osnap) with F3 on the keyboard, and orthogonal drawing (Ortho) with F8. We can create the curve by placing the points and pressing enter from the keyboard. When the profile curve is ready, we can call the Revolve command again. Let’s mark the curve we just drew and press Enter on the question it asks as the first input. Let’s give the axis of rotation by drawing a straight line and enter the starting angle and rotation angle as 0 and 360 and press Enter.
If things don’t go the way you want, you can exit the Rhino command with Esc on the keyboard. You can undo it by pressing the letter U and Enter and undo the last operation. The CTRL+Z combination will do the same.
Revolve Surface
The figure above shows the drawing of the profile curve and entering the desired rotational axis on the Rhino screen while creating the surface. The figure below shows the result of the Revolve process. Try to follow the steps described above until you get a similar result.
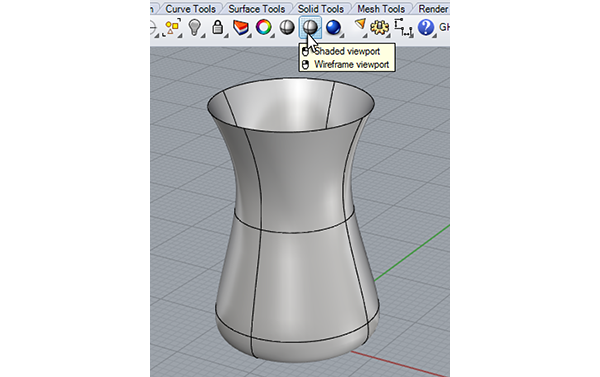
In Rhino’s perspective view, you can rotate the image by holding down the right mouse button (RotateView). You can also zoom in and out with the middle wheel, and pan the image by holding down the right button with Shift.
Conclusion for Rhino+Gh Introduction
This is it for now. You can see that the modeling process in Rhino requires a step-by-step execution of commands and inputs. In the next episode of Rhino+Gh, we are going to translate and repeat the same process in Grasshopper.
Cite this post
Related Posts
Hello World! Grasshopper for Beginners (6)
January 17, 2023
Let’s continue the Grasshopper for Beginners series. We start with the traditional “Hello World!” displayed on the Rhino screen: Placing the Components In most CAD programs, the text creation function, which is the equivalent of the Text command, is performed by a component called Text Tag (Tag) in GH. The Text Tag (Tag) component is in the Dimension panel under the Display tab. If you’re not comfortable with tabs and panels yet, you can revisit this section from the beginning….
Data Domains in Grasshopper
March 24, 2024
In this short tutorial, I am showing the essentials of data domains in Grasshopper. A domain is a data type in Grasshopper that represents a portion of the 1d or 2d number space. This requires a starting and ending point in those spaces. In 1d, these points are two numbers. Then, the domain represents all the numbers between them. In 2d, a data domain is represented by two coordinates (u, v). This presentation illustrates this concept with the area defined…
History: Grasshopper for Beginners (2)
November 23, 2022We continue the Grasshopper for Beginners (2) series with the data flow programming concept. Control flow diagrams we use in traditional programming languages control the sequence of executed commands. In data flow diagrams, the focus is not on the order of commands but on how the data progresses. In the previous example, it doesn’t matter whether the Circle and Polyline command runs first. As a result, both are prerequisites for Extrude. Extrude command will not be executed until both are…
Data Structures in Grasshopper
June 8, 2023
Data structures and data matching principles are important to be able to design with Grasshopper. In this tutorial, I show data matching procedures with arithmetic operations. Then I repeat them in the production of geometric objects. I think it should be easier to use this programming language once the students understand the basic principles. Therefore it would be easier to design with it. Sometimes the design process of these diagrams proceeds from left to right (by induction) but sometimes it…
Design Exercise of Dataflow Diagrams
January 24, 2019
Here is a design exercise I’ve been giving to students. It aims to familiarize students with the concept of dataflow diagrams used in Grasshopper. Dataflow is a different concept than conventional computer programming. Here is a good comparison between control flow and dataflow languages. In most educational settings (such as courses and workshops) we concentrate on the fundamental issue of dataflow management via design projects. This requires us to think about a design exercise of dataflow diagrams. In the most…