
Voronoi Puzzle
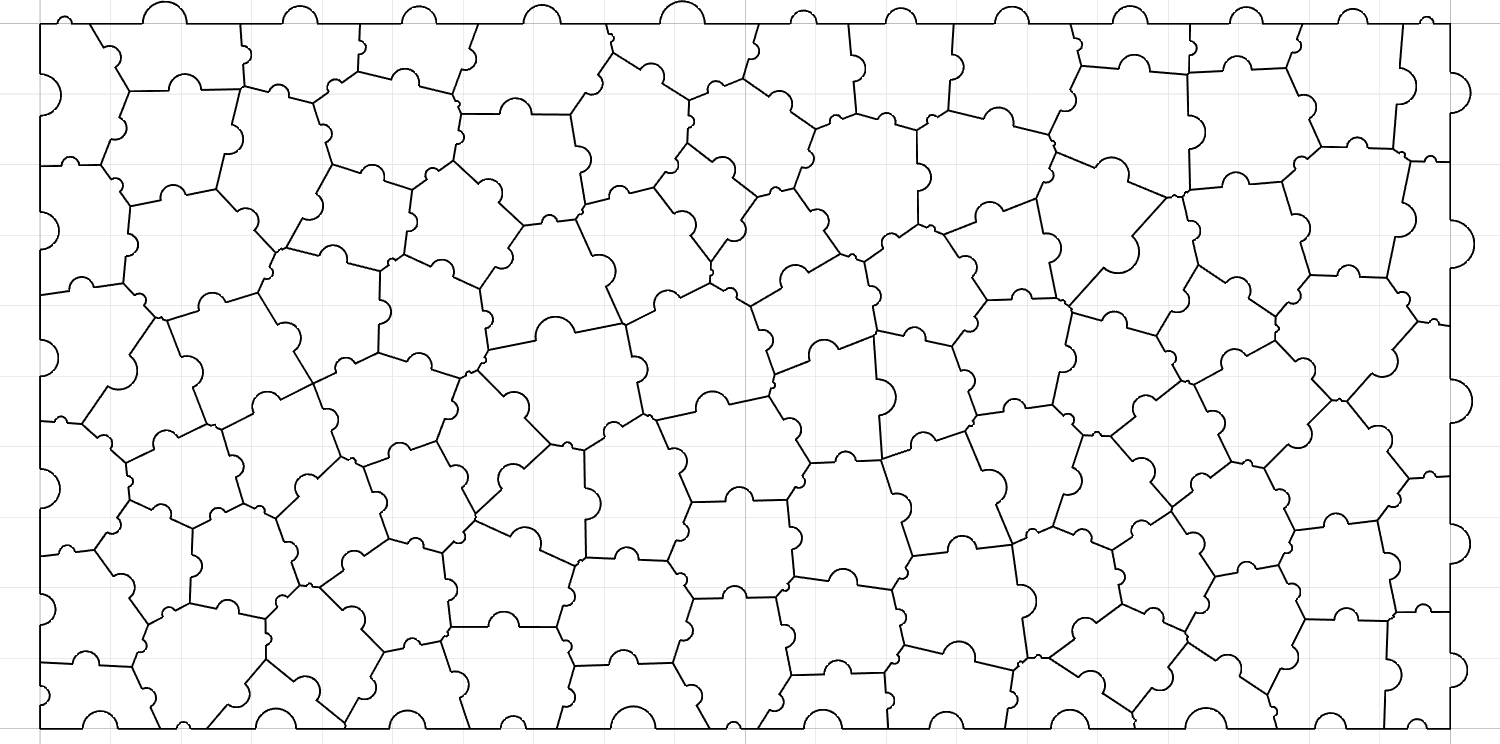
In this Voronoi puzzle exercise, we derive two-dimensional puzzles by using Voronoi diagrams. This is similar to my previous studies here, and here.
Part 1: The Random Voronoi Diagram
In section 1 of the below image, I use a rectangular region to generate random points. Then, I create a standard Voronoi diagram by using those points. Finally, I explode the Voronoi cells.
Part 2: The Voronoi Puzzle Details
In the second part, we draw an arc on the edges of each cell. This makes the indentations and protrusions where the cells are interlocked. The parameters required to be able to draw the arc are the arc’s center point and radius and what angle it sweeps. This time we calculate the center point via a plane. Because the directions of all the flaps are different from each other. Each plane is placed at the midpoints of the edges. For this, it will be sufficient to enter the parameter 0.5 after reparameterizing all the exploded edges to the Evaluate Curve (Eval) component. The X input of each plane, that is the X axis, is connected to the T, or tangent vector, which comes out of the Evaluate Curve (Eval) component.
Notice that the X-axis, which is the red axis line of the symbols representing the planes, is parallel to the border lines of the cells. After giving the center point and one of the axes for a plane, the other axis will be the direction facing at 90 degrees.
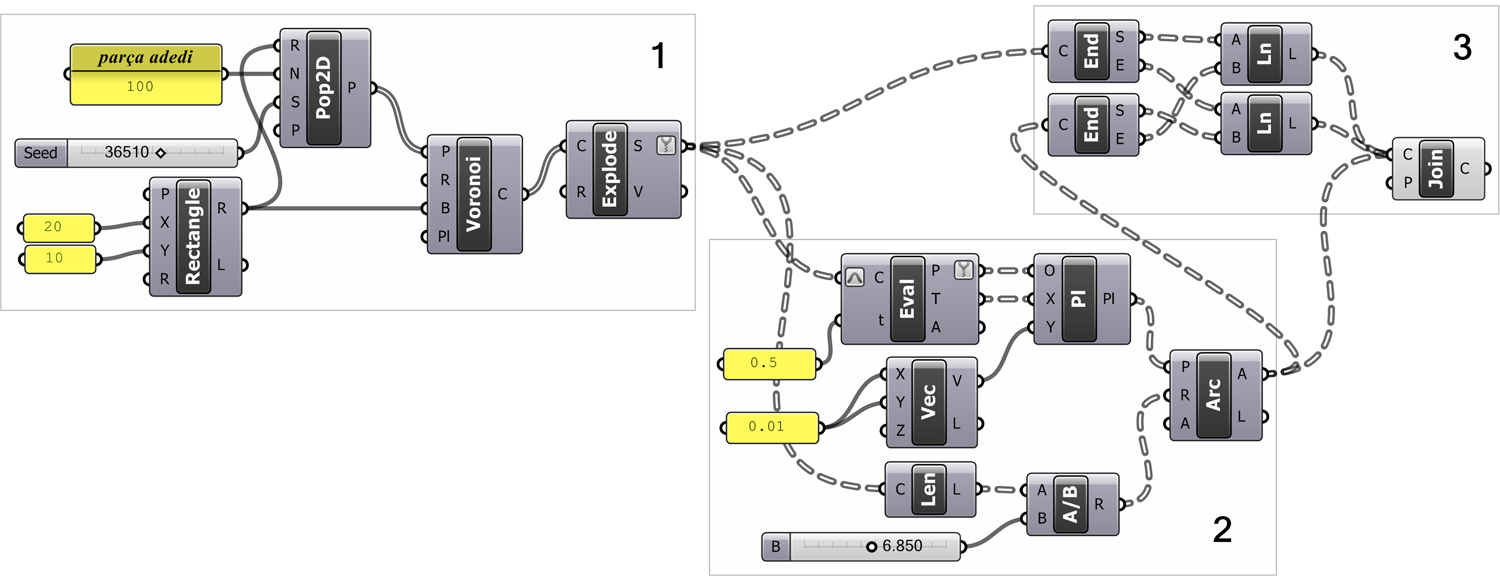
In this case, there are two possibilities for our Y-axes. These are the axes in the +90 or -90 direction to the current X. The value we will give to the Y input of our plane component determines this. We create a simple vector with the Vector XYZ (Vec) component and connect it to this input. Here you can set all planes to face the other way by entering a positive or negative number in X and Y. This will eventually replace all the indentations and protrusions.
Part 3: Trimming and Closing the Cells
Now that the planes we will draw our arcs are ready, we can switch to the radius value that we will connect to the R input of the Arc component. You can also set this value as a constant. In practice, a radius value is calculated as a certain ratio of each edge. The Length (Len) component, which calculates the length of the edges, helps in this work. Finally, input A of the Arc component has the default value range of “0 To Pi”. This value corresponds to a semicircle between 0 and 180 degrees.
In the third part of the application, we cut the edge lines (trim) with these arcs. There are components that perform trimming in the Grasshopper. It is often possible to do the cutting in different and easier ways. We obtain our points using the End Points (End) component, which gives the beginning and end points of both the sidelines and the arcs. Then we draw them again with a Line (Ln) component.
Final: Voronoi Puzzle
You can see what’s going on by closing the Previews of everything and just opening the Line (Ln) components. By using two Lines (Ln), we draw these lines on top of each other. But this allows the final Join Curves (Join) component to join each puzzle piece in a separate closed polyline. If you bake this component and examine it in Rhino, you can obtain the cells separately in every Voronoi Puzzle instance.
Cite this post
Related Posts
Voronoi Kündekâri
June 28, 2013
Kündekâri is an old woodworking technique, composed of interlocking parts without any glue or nail. It is primarily used in wooden doors and minbers inside Mosques. The interlocking system makes the whole structure very durable. I tried to model this technique using the Voronoi pattern, naming it Voronoi Kündekâri. Below you see a typical example of Kündekâri pieces and the resulting pattern. The interesting part of the Grasshopper model is to define the tongue-and-groove detail. It is similar to a…
3D Voronoi Puzzle
May 3, 2023
Here, our aim is to generate a 3D Voronoi puzzle ready for 3D printing. Below is the step-by-step explanation of this Grasshopper algorithm: The 3D Voronoi Puzzle Step number one is the application we saw earlier in the Voronoi diagrams. We obtain random polyhedra within a given volume quickly. The basic features we need for the puzzle are: (1) When we solve the puzzle the final volume should be a cube. (2) We should control the dimensions of the total…
Puzzling
March 21, 2012
Nowadays, I found myself back into traditional hand sketching. Several failed attempts on Grasshopper led me back there. NURBS (and Grasshopper) somehow limits our conception of surfaces to four-cornered (or two-directional) manifolds. Although it sounds like limiting our designs, having four-cornered component spaces has still lots of experimental fields for designers. Escher is a cult person, who transforms the euclidean coordinate system to meet his design intentions. There are lots of interesting research about him, and he shows us how…
Voronoi Cage
June 26, 2023
I have created a straightforward Grasshopper code that generates a Voronoi diagram on a surface. Then, it adds thickness to form a structure called a “Voronoi Cage.” In the initial step, I project a surface onto the ground plane (Z=0). The projected frame serves as the boundary for two operations: generating random points using the Populate 2D (Pop2D) function and calculating the Voronoi diagram based on these points. The resulting Voronoi cells are then slightly offset inwards. Moving on to…
Fermat’s Nightmare
October 14, 2026
Revisiting a specific mathematical phenomenon that I previously explored twice, here (in 2017) and here (in 2011), from a different angle in 2026 now. This was the final video (from 2023) that I found in my junk folder during the blog’s resurrection. Today, designers mostly know Fermat through the famous 137.5-degree angle of rotation, which is the mathematical formula used to describe the arrangement of sunflower seeds. However, today I will speculate on a nightmare of Fermat’s. Because Fermat, in…