
String Art in Rhino Python
String art is a cool art technique that combines geometry and aesthetics to recreate images using lines between pins. Here is a good reference to start studying it. In this post, I explored a custom Rhino Python script designed for Rhinoceros 7 and 8. It transforms a grayscale image into a dense web of threads. The algorithm analyzes the darkest areas of the image and connects pins in a circular layout to form compositions. The script begins by converting a user-selected image into grayscale and masking it within a circular region. The user defines the number of pins and lines. From there, the algorithm evaluates possible connections. Then, it selects the one with the lowest average brightness at each step. Each line subtly lightens the image along its path, progressively refining the output. The code displays the final result in the Rhino viewport as a polyline, with numbered pins for reference.
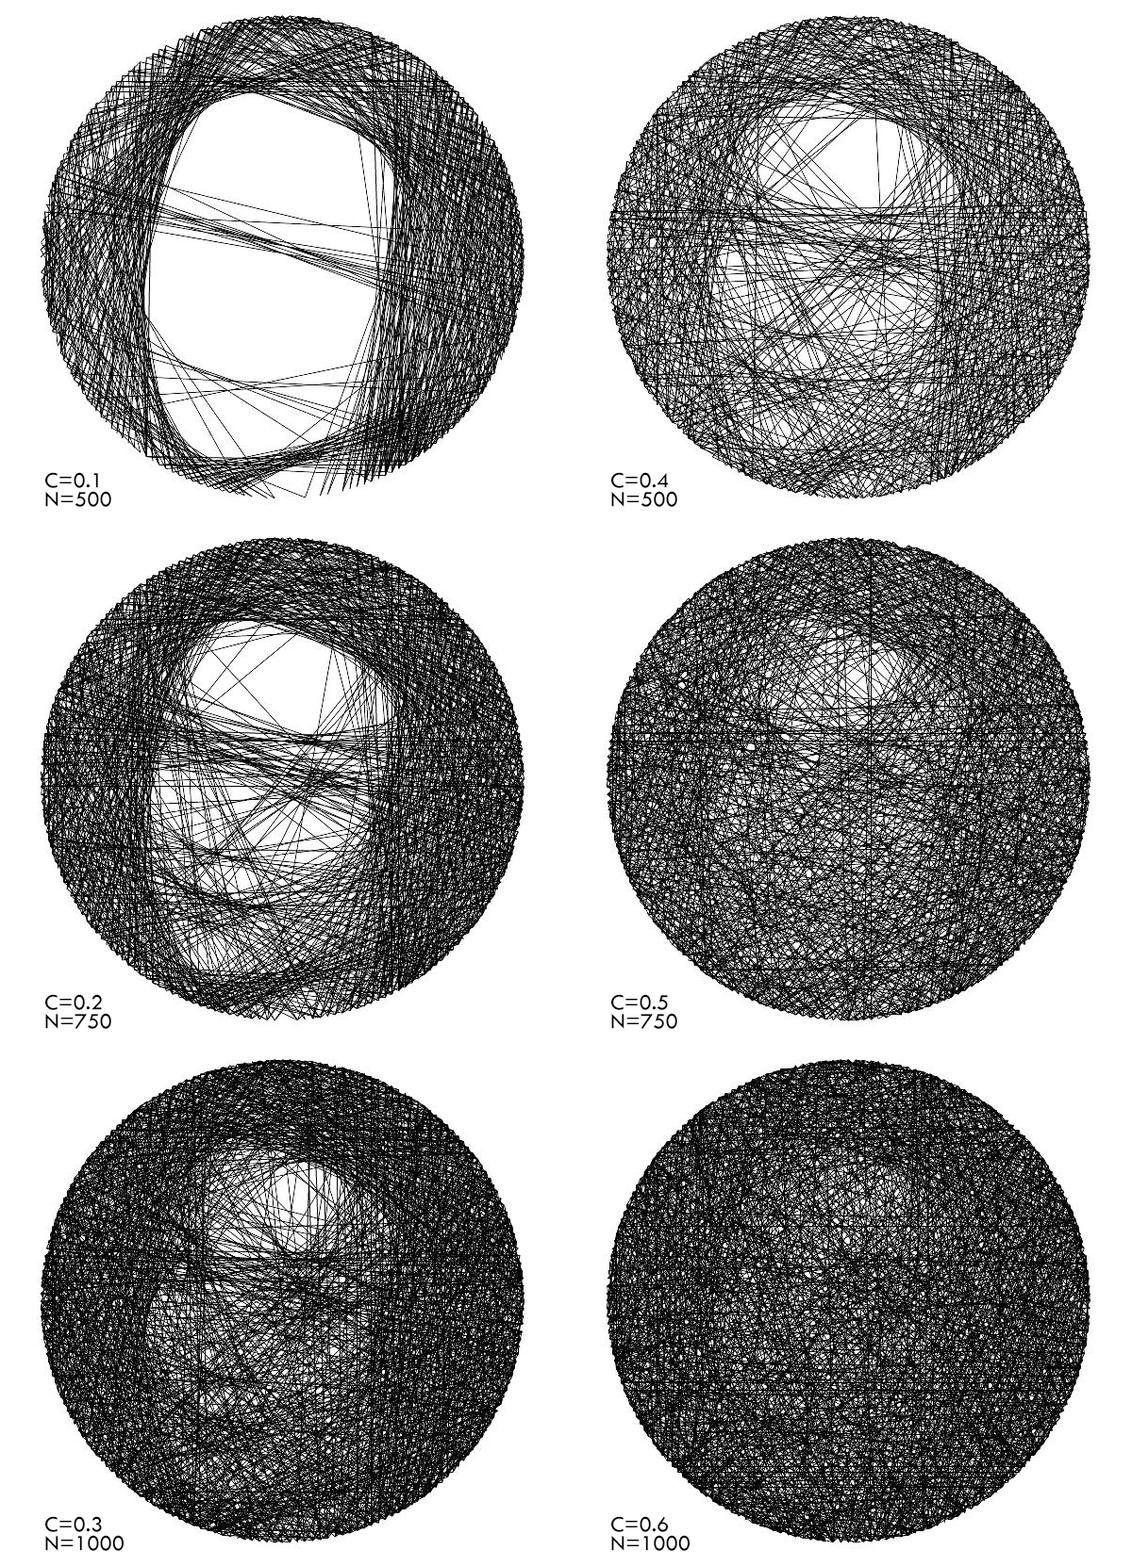
This code was developed for Rhino 8 (Python 3), but it also works well in Rhino 7 (IronPython, a bit slower, I guess). To run the code, simply open the Python editor in Rhino, paste the script, and run it. Then, you will be prompted to select an image file and enter parameters like contrast, number of lines, and number of pins. After processing, the string art pattern will appear in the Rhino viewport with numbered pins for reference. Note that you may wait for a long time if you enter large numbers. Also, the physical output will depend on the thickness and the transparency of the string you choose. This is why the String Art algorithm does not guarantee a perfect outcome at every trial. Below is the complete Rhino Python code. You can download the code at the bottom of this page, also. The script gives the numbered order of the pins in the toolbar. If you are patient enough, you can try building it physically. Honestly, I didn’t test that. The result is also dependent on the thickness of the wire you use.
import rhinoscriptsyntax as rs
import math
import Rhino
import scriptcontext as sc
import random
from System.Drawing import Bitmap
def grayscale(color):
	return (color.R + color.G + color.B) / 3
def get_image_pixels(image_path):
	img = Bitmap(image_path)
	width, height = img.Width, img.Height
	pixels = []
	for y in range(height):
		row = []
		for x in range(width):
			color = img.GetPixel(x, height - 1 - y)
			gray = grayscale(color)
			row.append(gray)
		pixels.append(row)
	return pixels, width, height
def mask_circle(pixels, width, height):
	cx, cy = width / 2, height / 2
	r = min(width, height) / 2
	masked = []
	for y in range(height):
		row = []
		for x in range(width):
			d = math.hypot(x - cx, y - cy)
			row.append(pixels[y][x] if d <= r else 255)
		masked.append(row)
	return masked
pin_points = []
def create_pin_points(center, radius, count):
	global pin_points
	pin_points = []
	for i in range(count):
		angle = 2 * math.pi * i / count
		x = center[0] + radius * math.cos(angle)
		y = center[1] + radius * math.sin(angle)
		z = center[2]
		pt = Rhino.Geometry.Point3d(x, y, z)
		pin_points.append((pt, i+1))
		if count <= 200 or i % 10 == 0:
			rs.AddTextDot(str(i+1), pt)
def average_grayscale_on_line(p1, p2, pixels, width, height):
	dx, dy = p2.X - p1.X, p2.Y - p1.Y
	length = math.hypot(dx, dy)
	samples = int(length)
	if samples == 0:
		return 255
	inv = 1.0 / samples
	total, count = 0, 0
	for i in range(samples):
		t = i * inv
		x = (1 - t) * p1.X + t * p2.X
		y = (1 - t) * p1.Y + t * p2.Y
		px, py = int(x + 0.5), int(y + 0.5)
		if 0 <= px < width and 0 <= py < height:
			total += pixels[py][px]
			count += 1
	return total / count if count > 0 else 255
def lighten_pixel(pixels, x, y, strength=0.02):
	if 0 <= x < len(pixels[0]) and 0 <= y < len(pixels):
		g = pixels[y][x]
		pixels[y][x] = min(255, g + (255 - g) * strength)
def draw_string_art(pixels, pin_points, width, height, total_lines=500, min_dist_ratio=None):
	sequence = []
	radius = min(width, height) / 2
	if min_dist_ratio is None:
		min_dist_ratio = max(0.1, 10.0 / len(pin_points))
	min_dist = radius * min_dist_ratio
	used_lines = set()
	current_pt, _ = random.choice(pin_points)
	poly_pts = [current_pt]
	lines_drawn = 0
	while lines_drawn < total_lines:
		min_gray = float('inf')
		next_pt = None
		for pt, _ in pin_points:
			if pt == current_pt:
				continue
			dist = current_pt.DistanceTo(pt)
			if dist < min_dist:
				continue
			key = tuple(sorted([(current_pt.X, current_pt.Y), (pt.X, pt.Y)]))
			if key in used_lines:
				continue
			avg = average_grayscale_on_line(current_pt, pt, pixels, width, height)
			if avg < min_gray:
				min_gray = avg
				next_pt = pt
		if next_pt:
			key = tuple(sorted([(current_pt.X, current_pt.Y), (next_pt.X, next_pt.Y)]))
			used_lines.add(key)
			l = current_pt.DistanceTo(next_pt)
			samples = int(l)
			for i in range(samples):
				t = i / samples
				x = int((1 - t) * current_pt.X + t * next_pt.X + 0.5)
				y = int((1 - t) * current_pt.Y + t * next_pt.Y + 0.5)
				lighten_pixel(pixels, x, y, strength=contrast)
			poly_pts.append(next_pt)
			current_pt = next_pt
			for pt, idx in pin_points:
				if pt == next_pt:
					sequence.append(idx)
					break
			lines_drawn += 1
		else:
			current_pt, _ = random.choice(pin_points)
			poly_pts.append(current_pt)
	polyline = Rhino.Geometry.Polyline(poly_pts)
	sc.doc.Objects.AddPolyline(polyline)
	sc.doc.Views.Redraw()
	print("Done. Here is the ordered list of pin IDs:")
	print(sequence)
image_path = rs.OpenFileName("Choose an image file")
contrast = rs.GetReal("Contrast level (0.00-1.00)", 0.25)
line_count = rs.GetInteger("Number of lines", 700)
pin_count = rs.GetInteger("Number of pins", 200)
max_lines = min(line_count, pin_count * 6)
if image_path:
	print("Calculating...")
	pixels, img_w, img_h = get_image_pixels(image_path)
	masked = mask_circle(pixels, img_w, img_h)
	create_pin_points(center=(img_w/2, img_h/2, 0), radius=img_w/2, count=pin_count)
	draw_string_art(masked, pin_points, img_w, img_h, total_lines=max_lines)
Cite this post
Related Posts
ASCII Art in Grasshopper
August 24, 2024
ASCII art is a graphic design technique that uses characters from the ASCII (American Standard Code for Information Interchange) set to create images, symbols, and designs. This form of art involves arranging text characters to form a visual representation of objects, scenes, or abstract patterns. I first encountered this art form in the 90s through readme text files and computer games. Years later, attempting to automate it in Grasshopper was a lot of fun. My initial goal was to calculate…
Subdivide by Image Contrast
October 17, 2012
This was my old plan to work with images in Grasshopper. Certainly, that was not the result I expected, but this could be counted as a starting point. After seeing beautiful circle packing compositions here, I decided to program Grasshopper, so that it’ll create a subdivision, based on image data. This was the initial version, just subdividing a plane with Voronoi points and visualizing it according to the image’s color values of proper UV coordinates. There is no interpretation on…
Fibonacci Portraits
December 27, 2023
“In the heart of a sunflower’s embrace, its seeds weave a poetic tale—a dance of two spirals, parastichies they’re called. One unfurls gracefully from the center in the hush of clockwise whispers, while its counterpart whispers secrets in the tender breaths of counterclockwise motion. A subtle ballet unfolds, where the number of these spirals gracefully mirrors the whispers of adjacent Fibonacci numbers, composing a delicate symphony in the sun-kissed fields.” says ChatGPT if I force it to be a little…
Image Sampler Revisited
March 17, 2015
Image Sampler of Grasshopper saves life if used responsibly. While explaining the component to this year’s ARCH362 students, I used this simple example that generates numbers from a beautiful picture of “metal foam” and uses it to generate lots of circles: Metal foams are lightweight but strong materials, that are typically produced by injecting gas into the liquid metal. Of course, it becomes easier to teach something when you manage to attract the attention of students.
Image Processing Basics
November 1, 2013
This was the initial example of image processing in our Parametric Modeling class. Hand-drawn and digital diagrams can also be digitized and used in order to describe certain parameters for design formation. Such algorithms would similarly use the Image Sampler Component of Grasshopper. In the algorithm below, image data is used to capture black pixels as attractors of a Voronoi subdivision. A regular point grid is dispatched according to Brightness values so that the points that lie on the lines of…