
Animated Parameters
We’ll use the “Animate” function in Grasshopper3D to create a stop-motion animation. First, you need to determine the parameters you’ll animate, which means defining maximum-minimum values of it. In our example, we’ll be using a simple bezier curve generation algorithm. In this definition, we plan to animate one parameter which is the value of “t” between 0.0 to 1.0. This single change affects various things in the model. You may find them by studying the definition. There is a list of points moving along circles that are also associated with the cause of “t”. This gives a sense of motion to the curves, while it seems to be re-constructed using local point parameters and drawn by sub curve component. Briefly, while we actually animate one parameter (t) this also affects the positions and parameters of various other objects.
After we decide what to present as an animation, the second step is to determine the length of the animation, thus the number of frames (rendered still images) to be needed. In order to create a smooth motion, we generally create 25 frames per second (FPS), which means, there are 25 still images, combined into one second of motion. We plan complete the movement described above in 10 seconds. Then, we need 10×25=250 frames for a 10-second 25 FPS animation. The third thing is the dimension of the video. As we’ll be displaying the videos on a data projector, it’s best to create a standard (not wide) screen ratio, which is 4:3. 800×600 might be a good choice. Finally, the file format of the video will be “mp4”, which can also be used to display the video on the internet. We’ll need these tools;
- Of course Rhinoceros 3d and Grasshopper 3d,
- A free tool to combine the images to create an animation. We’ll be using ffmpeg. Put the exe file into a specific folder (in our example it’s copied to a folder named “test” at drive C: that is C:/test/ffmpeg.exe) ffmpeg is a free tool, which can be downloaded from the internet. That’s all. Now, we’ll go step by step to create the animation.
Getting ready for the animation
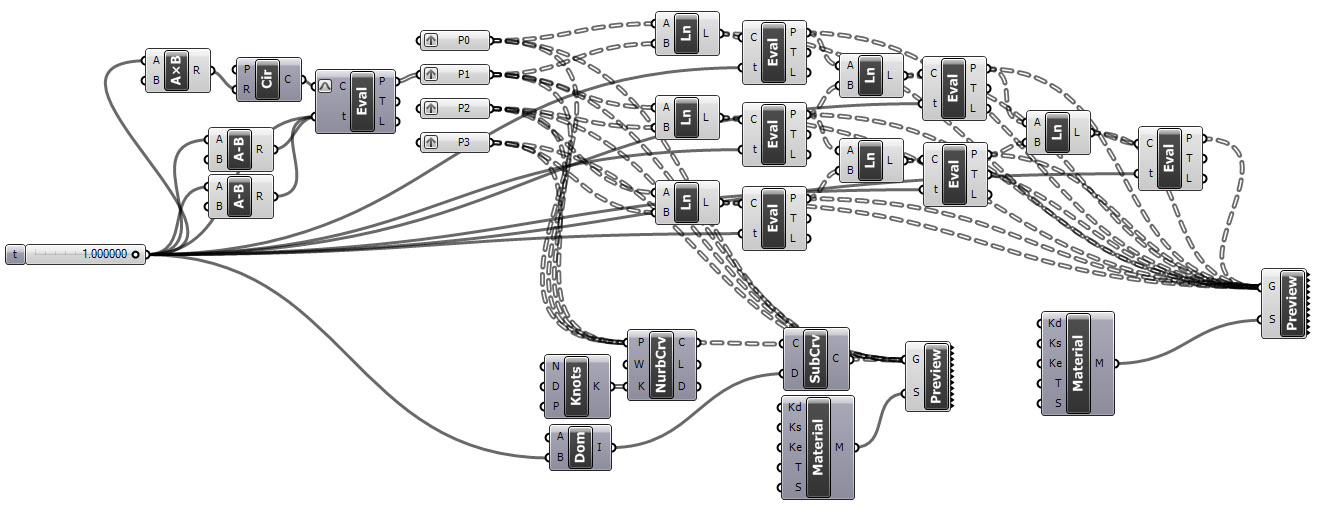
Play with the parameter “t” to understand how it works and how it draws the bezier curve at the “TOP” viewport. Please note that animation will be created using all values (from minimum to maximum) of that particular parameter “t”. You may change start and end limits in your own works, by editing parameter limits.
Creating image stills
Make sure you created the folder for the still images. In this example, it is named C:/test/ Right-click on parameter “t” and hit “animate”. In the animation control window; first, point the output folder to “C:/test/”. Then you should set a filename template. Use png file type, as jpeg could cause problems with ffmpeg. This is “Frame_{0:00000}.png”. The source will be “top view” in this example. The resolution will be 800×600 as explained at the beginning. You may drag the edges of this window to see the whole frame. The frame count will be 250 as explained above. You should focus the top view on the subject in order to create an appropriate animation. Please check all extreme values of the parameter “t” so that in all frames, it’ll stay within the rendered window. We included a tag t = {1:0.00##} so the animation will display the t value at the bottom of each frame. Now, hit ok. button and Grasshopper3D will start to create frames by dividing the domain 0.0-1.0 into 250 equal lengths and increment the parameter, exporting the result to a numbered png file. It’ll take about one minute to complete.

Combining still images into an animation
Now we have 250 still images and one ffmpeg.exe file in C:/test/ folder. Assuming you are using the Windows platform, hit Windows logo+R to open the “Run” dialog and type “cmd” to open the command prompt. Go to the test folder by typing “chdir C:test”. Now, run this command:
ffmpeg -qscale 1 -i Frame_%05d.png movie.mp4Your animation should be ready there. Ffmpeg has lots of options. You may add audio and change quality and file format by typing appropriate options. We may discuss that later.
Update: Here is an updated version of the Grasshopper definition in this post:
Cite this post
Related Posts
Scary Patterns
August 6, 2026
While digging through my archives, I found an old animation I made in 2023. Back then, I was generating patterns with Parakeet. Thanks to this talented add-on, I managed to create a nice pattern by dressing a different component onto a Snub Square tiling base. However, for some reason, things started turning into a horror movie after that. MultiPipe was popular back then. So, I converted this pattern into surfaces using MultiPipe and attempted an animation using Rhino’s rendered viewport…
Chamfered Polyhedra
April 2, 2025
I had been researching Goldberg Polyhedra for a while. While exploring how to perform chamfer operations in Grasshopper, I found some interesting results. I want to share them with you. In this Grasshopper project, I reused my previous work, where I built a dodecahedron using the golden ratio. Essentially, all I did was add the Fillet Edge component. I don’t use this component much, so I learned it through this process. At one point, I realized I had created a…
Animated Tree Growth
May 26, 2023
The Animated Tree Growth is an interesting study for Grasshopper. First, I developed a regular tree generation definition similar to those I studied earlier, here, here, and here. In component group 1, I develop an initial generator arc. Then, in group 2, I generate the fractal tree by using iteration. I did this with the help of the Anemone add-on. The interesting and original part of this definition is group number 3. Here I am trying to trace the growth…
Camera Animation
April 28, 2014
Here is the simple Grasshopper definition that activates Rhinoceros’ camera by given parameters. Camera position is determined by the “point-oriented” method here. This means that you have to have a target point for the camera first. In fact, I was trying to find a suitable command for getting the actual camera position of the Rhinoceros but I think it is impossible (for now). I couldn’t track the camera object by its ID number also. There are some Grasshopper components that deal with…
Strings
January 17, 2014
Here is a test of the optical flow component of Firefly. You can check the Firefly add-on to Grasshopper here. As an ongoing research project, I’ve been searching for a suitable platform to study responsive geometric patterns. This initial study focuses on one particular effect of Firefly, the optical flow that outputs the direction vectors on a given webcam input. I developed traces of it by joining endpoints of these vectors together, creating strings. Then, recorded them to provide better…