Vector Class in Rhino Python
by Tuğrul Yazar | August 16, 2021 17:44
In this new series, I will be using Rhino Python to create some of the fundamental mathematical objects in Rhino. We will learn how to code in Python, and also try to get deeper into the intuition behind some of the fundamental concepts we use every day in Rhino and Grasshopper. The Vector class in Rhino Python is the starting point of this journey. Just like vectors, most of the topics are already built-in object classes in RhinoPython. But I wanted to re-create them for educational purposes. As a result, we begin with the building blocks of linear algebra: vectors. We will define vectors as objects with only one attribute (variable), which is a coordinate, indicating the tipping point of the vector. However, this is the most simplistic starting point. You can refer to Wikipedia for a more formal definition of vectors.[1]
The Code: Vector Class in Rhino Python
import rhinoscriptsyntax as rs
class Vector:
	def __init__(self, point):
		self.components = point
Above is the first step, creating a new object class called Vector. An object class is just like a blueprint that we can develop instances from. Therefore, we will be using the Vector class many times in the future. When you enter the EditPythonScript command in Rhino, enter the above code and run it by pressing F5, you will see that it will not do anything. This is because of the fact that this code only defines the Vector object class, the blueprint. The instances created from this blueprint will be the vectors we will use later on. Then, let’s explain the above code line-by-line below:
| Line | Explanation |
| 1 | First, retrieve the functionality (objects and methods) of Rhino inside Python. “rs” is the shorter name defined for the RhinoScriptSyntax module. “rs” is a naming convention. |
| 2 | Next, define a new object class named “Vector”. Similarly, as a naming convention, the class names start with an uppercase letter. Moreover, the colon symbol (:) is an important syntax rule here. |
| 3 | Inside of the newly defined class, (notice the indentation) define a new method named “__init__”. This is a special method name that is used to create new instances (we can not change it). Inside of the parentheses, there are two input values. “self” represents the current vector, and “point” represents the tipping point of the vector. |
| 4 | Finally, inside of the new method, “__init__”, (notice the second indentation) we define an attribute called “components” and define its value equal to the input value of the point. |
Testing the Vector Class
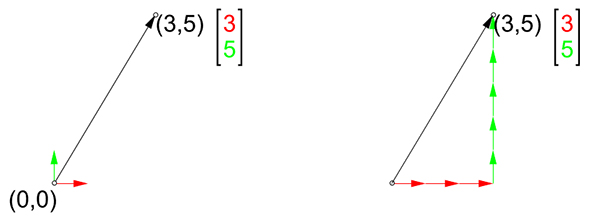
The below figure shows the idea behind vector components. In this case, a 2D vector is represented by two numbers. These numbers are defining the length and orientation of the vector. Note that, this representation does not store any origin point. Because here, all vectors with the same components are regarded as the same vector. We will benefit from this assumption in the future.
You can test the Rhino Python code by creating vectors. Add this testing code at the end of the above code and run it.
v = Vector([1,1,0])
print(v.components)
This will create an instance of the Vector class and assign it in a variable “v”. While defining the instance, we entered an input of three numbers in square brackets, creating a list. As a result, the list of three numbers represents the x, y, and z coordinates of the vector’s tip point. Notice that the parentheses that are used to cover the inputs of the Vector, and the square brackets covering the list of three numbers are all closed at the end of the line. Thus, this code will run the __init__ method we’ve just defined and will use [1,1,0] as the input named point. Then, it will define the “components” attribute, and put the value of the point input to it.
In the second line, we use the built-in “print” method of Python, to display the “components” attribute of our new object. The dot (.) notation here, like “v.components” accesses such attributes (values) in a hierarchical way. This statement will get the “components” value of [1,1,0] we just entered in our object “v” and print it to the Command Bar or Rhino, and the console of Rhino Python.
Conclusion
You can continue creating different instances of the Vector class. But remember to assign different variables (instead of “v”) so that it won’t overwrite the previous instance. The variable names are totally up to you, but as a convention, you can use more informative names (not “v”). For example, you can use vector1, vector2, …etc.
To sum up, if you have no previous experience in Rhino Python, it may be difficult to follow all of the concepts explained today. Therefore, a minimum of Python support and experience would be very helpful. In the next lesson,[2] we are going to visualize these vectors in the Rhino viewport.
- a more formal definition of vectors.: https://en.wikipedia.org/wiki/Vector_(mathematics_and_physics)
- In the next lesson,: https://www.designcoding.net/vector-class-2/
Source URL: https://www.designcoding.net/vector-class-in-rhino-python/