Display Method for Vector Class
by Tuğrul Yazar | August 17, 2021 13:06
Let’s continue from the Vector class that started yesterday. Previously, I defined this class to store three numbers (coordinates), named as “components”. I defined a method named __init__ for this. Similarly, I am adding a display method to the Vector class today. Note that I am using Rhino 6 in this code, but it should also work in Rhino 5 or 7.
The code
import rhinoscriptsyntax as rs
class Vector:
	def __init__(self, point):
		self.components = point
	def display(self):
		line = rs.AddLine([0,0,0], self.components)
		rs.CurveArrows(line, 2)
v = Vector([2,2,0])
v.display()
Below is the line-by-line explanation of the method:
| Line | Explanation |
| 1-4 | Already explained before.[1] |
| 5 | Start the definition of a new method named “display” within the Vector class. This method will not take any inputs yet. “self” is for syntax purposes, representing the object instance we are working with. |
| 6 | Here, we define a variable named “line”. This variable will hold the result of a command executed in “rs”, which is the library of commands in Rhino. From the rs module, we are firing the “AddLine” method. To get help about the methods inside the rs module: you can use this reference. As you see, the AddLine method has two inputs. The first input is the list of numbers, representing the starting point of the line. In our case, the starting point is the origin ([0,0,0]). The second input is the coordinate we hold in our vector object, which can be accessed by self.components. |
| 7 | Since the result of the above operation draws a line in Rhino viewport, it also puts the ID number of the line object in a variable we named as “line”. Now, we are using this ID number to access that line and add an arrowhead to it by utilizing another rs method “CurveArrows”. If you look at the reference of this method, it also takes two inputs: the curve object, and an index number representing the placement of the arrow. Note that, checking the reference is an important habit. Because, we cannot understand what is that “2”, otherwise. |
Testing the method
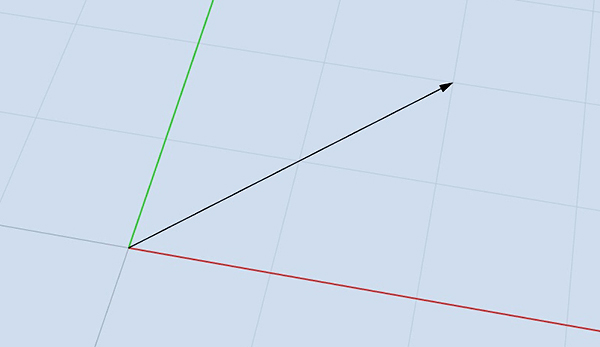
The last two lines of the above code are for testing purposes. Firstly, the 8th line creates one vector object by using the newly developed Vector class. Then, the last line calls the “display” method of the object, firing the new method we added. Finally, if everything is correct, you should be seeing the arrow in the Rhino viewport. For further study, you can test the method with several different vector objects. Note that the coordinates are stored in the object attribute, named “components”. Currently, it is only accepting the Rhino origin as the tail point. However, we are going to further develop this method in the next lesson.
That is it for today.
- Already explained before.: https://www.designcoding.net/vector-class-1/
Source URL: https://www.designcoding.net/vector-class-2-display-method/