Attractor Basics
by Tuğrul Yazar | June 29, 2023 21:34
In this short tutorial, I want to give Grasshopper[1] beginners the basics of how we create attractor[2] systems. The Grasshopper definition you see in the below figure is the equivalent of array-type copying operations in CAD. However, unlike in CAD programs, here we are dealing with multiple generations of objects rather than transformations.
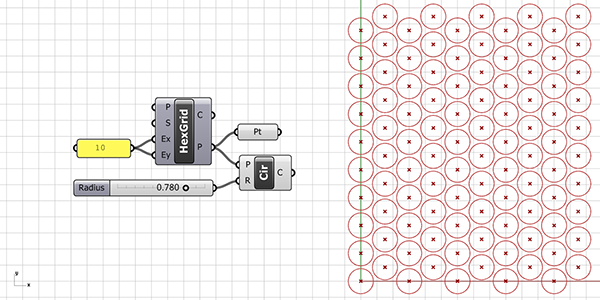
Attractor Basics: Data Matching
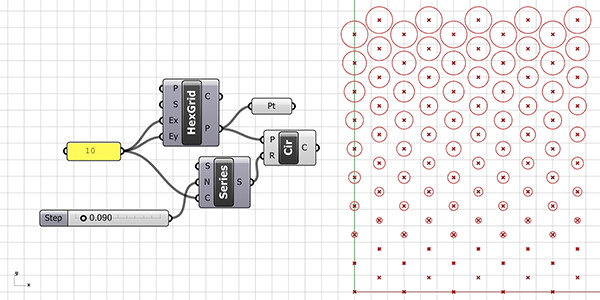
In the application you see in the figure below, each row of the hexagonal grid created with HexGrid has a different radius value. How did this happen? We can place a Panel component and control the output parameters. We can see that the hexagonal grid’s P output provides a data tree with 10 branches and 10 points in each branch. This time, instead of a single radius value for the circles, we generated 10 radius values with the help of the Series component.
We can see these values by connecting the Series’ S output to a Panel. We combine this series with a Circle (Cir) component that centers the grid points. Thus, we visualized how Hexagonal (HexGrid) creates a data tree. The points coming out of the Hexagonal (HexGrid) component first create points arranged upwards, and after a column is completed, these columns are duplicated to the right (assuming we are looking from a top view).
When each branch of the data tree is matched one-to-one with our radius list, the radii start increasing from the bottom-left circle. After matching the 10th circle on the top left with the 10th radius in the series, the next branch continues with the bottom point of the second column on the left. This is again a 10-element data list and will be matched with the radius values in the same order from the beginning. You can observe this process by changing the Ex input of the hexagonal grid to 1 and then 2. No matter how much we explain, sometimes it can be difficult to understand just by reading. You should actually do the application yourself.
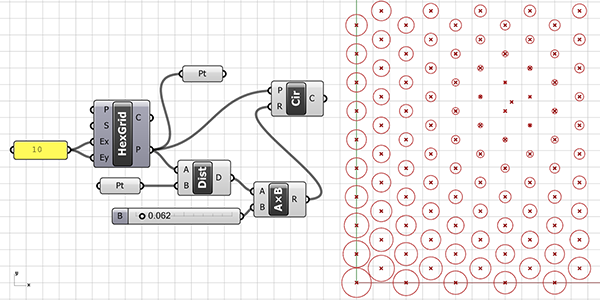
Point Attractor Basics
In the below figure, we incorporate attractors to make our circles behave differently. For this, you need to include a point in Rhino referenced into the Pt parameter. Or define a point within Grasshopper using the methods you already know and connect it here. Then, we calculate the distances from this attractor point to all other points of the grid using the Distance (Dist) component. After that, we use the Multiplication (AxB) component to proportionally reduce the distance values. We do this by multiplying them with a small number greater than zero. If this reduction process is not applied and the output D of the Distance (Dist) is directly connected to the R input of the Circle (Cir), each distance value will be equal to a radius value, resulting in all circles tangentially touching your attractor point. If you’re ready, we recommend trying it once.
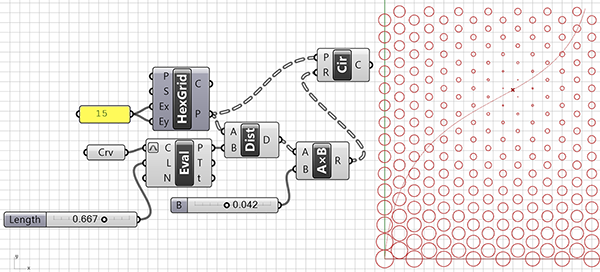
The point on a Curve
In the below figure, we made the attractor basics a bit more dynamic. This time, we use a point that we can move along a curved path as the attractor point. When you drag the Number Slider connected to Evaluate Length (Eval), you create a point moving along the curve. Later in the application, we used this point in the same way as before. One advantage of using the Number Slider is that it can provide the generated variations in a dynamic way, and it also allows you to create small animations through the Animate option. For this application to work, we must enter a curve into the Curve (Crv) data input. You can use the reference curve we explained how to draw in the previous section for this purpose.
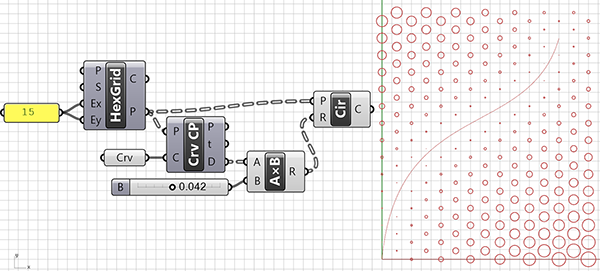
Curve Attractor Basics
In the alternative we show in the below figure, we did the same design. But with a curved attractor area instead of a point-based one. The only difference in this shape is that we calculated the distances. Then we processed it as the closest distance between the grid and a curve, rather than the grid and a point. The component used for this is Curve Closest Point (Crv CP). When it comes to diversifying shapes drawn on the grid, Grasshopper offers many different options. For example, it is possible to obtain the radius information of the circles not based on the distances between them and another geometric object. We can use any kind of numerical data we can obtain as the radius parameter.
I hope this explanation of attractor basics would be useful for those who are learning Grasshopper. Here are all the Grasshopper files in this post:
- Grasshopper: https://www.grasshopper3d.com/
- attractor: https://www.designcoding.net/tag/attractor/
- Download: https://www.designcoding.net/decoder/wp-content/uploads/2023/06/2023_06_29-figure1.gh
- Download: https://www.designcoding.net/decoder/wp-content/uploads/2023/06/2023_06_29-figure2.gh
- Download: https://www.designcoding.net/decoder/wp-content/uploads/2023/06/2023_06_29-figure3.gh
- Download: https://www.designcoding.net/decoder/wp-content/uploads/2023/06/2023_06_29-figure4.gh
- Download: https://www.designcoding.net/decoder/wp-content/uploads/2023/06/2023_06_29-figure5.gh
Source URL: https://www.designcoding.net/attractor-basics/